A Guitar string begins to tremble back and forth when it is plucked, sending waves of vibrations down the instrument’s length. The air inside the body of the Guitar is moved by the vibrations as they travel down the strings to the soundboard. Air rushes out of the sound hole and strikes the rigid hardwood back and sides, producing a musical note. The first Guitars, which are thought to have been made around 500 years ago in Spain, were quiet. But as time went on, their bodies became bigger, and now, even without electronic amplification, they can compete with other loud instruments like violins and banjos.
Usually, a Guitar is built in three to six weeks; more intricate Guitar might take up to six months. Additionally, a Guitar manufacturing plant can produce more than 250 Guitars each day when production is at its highest. However, as trees are living creatures, each piece of wood is unique, thus there is still some degree of uncertainty. If you want to build your Guitar, be sure to plan, move slowly, and don’t be afraid to ask for assistance. This is true whether you build a Guitar from scratch or modify an already-built Guitar. Make a schedule and confirm that you have the resources and time necessary to finish your job before starting.
Today, we’ll explain the building of a Guitar, but let’s first talk about two of the most crucial factors when it comes to building a Guitar.
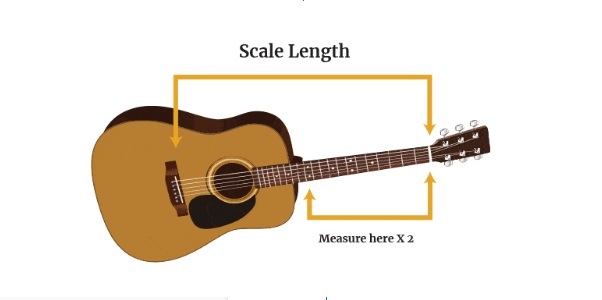
Understanding Your Guitar’s Scale
Before you build your Guitar, you need be aware of a few key guidelines. Knowing your scale is the most crucial rule. The distance from the top of the Guitar bridge to the base of the instrument is known as the scale. Measure from the front of the Guitar, where it meets the ideogram on the neck, and multiply that measurement by two to determine the scale.
Designing Your Guitar
Okay, let’s go on to the procedure’s most imaginative step.
You can start drawing some basic designs on paper once you’ve determined your measurements and decided which Guitar parts you’ll be using. You are now free to use your imagination indefinitely or, if you’d prefer, choose a more traditional style. Theoretically, you could make a design that resembled a ukulele if you wanted to.
A solution, if you’re having problems coming up with design ideas, is to look at other Guitars and see what’s out there. On make sure your Guitar has all the necessary qualities. Check out these online Guitar parts, to order any parts of a Guitar of your choice.
Once your design is complete, you must trace it onto the wood that will serve as the body. Get a 1/4″ piece of birch wood and glue it between the two chosen pieces if you wish to thicken the Guitar’s body. A lot of Guitar builders enjoy doing this.
The Materials
Piles of wood are first used to create Guitars. Typically, strong hardwoods like mahogany, rosewood, or maple are used to construct the backs and sides. Typically, spruce trees from Sitka or Adirondack species provide the tops because they are light and flexible enough to produce the vibrations necessary for the Guitar’s tone. (Pianos and violins also employ spice.) Materials Needed:
different types of wood (see below)
wood glue
lemon oil
sealer
sandpaper
clamps
a rotary tool and router
a circle cutter
Conditioning
When lumber is delivered, it still has moisture from the tree’s active phase. It must be dried before it can be carved into forms. Through a mixture of sitting in climate-controlled storage and cooking in a kiln, a massive metal furnace, this occurs over the period of months (or more than a year, in some situations).
Processing Of Wood
The wood is prepared to be carved into the smaller pieces that make up the top, back, and sides of a Guitar once it has dried. Each instrument contains about 115 distinct components. A panel of wood that has been split in two forms the top and back of a Guitar, respectively. Bookmatching is the process of matching the two pieces based on their colour and grain. To ensure that the components are the correct size for a particular model and that the wood is free from obvious faults, a technician may also utilise a plexiglass form.
The Glue Reel
You might not be able to tell that a Guitar’s top is made of two pieces that were adhered together, even if you examine very closely. This is due to the glue reel, a machine that resembles a Ferris wheel and is used to shave flat and tightly clamp the sides where the components attach. The light-colored spruce tips can be held up to a light once they have dried to look for flaws like knots or worm tracks.
Cutting
One at a time, the bookmatched tops and backs are fed into a laser cutter, which precisely shapes the models. The laser also cuts the side panels. The laser is quicker, more accurate, and wastes less wood than a saw. It is also safer to use.
Rosetting
Around their sound hole, several of the first Guitars included decorative floral patterns that both enhanced their aesthetic appeal and were believed to strengthen the aperture. These ornaments, known as rosettes, are still commonly used to adorn Guitars today. The rosette is manually inlaid by a fly cutter, a circular instrument; the trim can be made of plastic, wood, or mother-of-pearl.
Bracing
The braces, which are little spruce pieces, should next be glued to the underside of the top. Even though you won’t notice it once the Guitar is built, the bracing plays one of the most crucial roles in maintaining the Guitar’s shape. If you remove all of the bracing, the top would begin to collapse as the first result. This is due to the fact that properly adjusted and tightened strings have a pressure range of 150 to 190 pounds. The larger acoustic Guitars with robust steel strings are supported by this sturdy X-shaped bracing.
Side Bending
Here, One needs to perform some true magic: bend wood to create the Guitar’s swooping sides. A “shoe,” a press that employs heat and steam to soften and curve wood, is loaded with matching side panels. To make sure the angles are perfect, the two halves are then bonded together and secured using a form. It now begins to resemble the outline of a Guitar, which is designed like a figure eight to fit easily in your lap with your arm resting on top.
Affixing The Top And Bottom With Glue
What holds a whole Guitar together? Glue. This wood glue isn’t all that different from the white craft glue you usually have on hand from school. Along the side edges, a mahogany ribbon that has bendable grooves is affixed. This expands the surface area that can be used to glue the tops and backs, strengthening and securing those joints.
Binding, Pearling, And Friezing
The raw ends of the wood are shielded from bumps, scratches, and variations in temperature and humidity by the contrast trim that surrounds the edges of the majority of Guitars. Typically, this binding is constructed of wood or plastic. A technician “friezes” (cuts a channel into the Guitar’s edges) so that the binding will fit within. Additionally, she makes grooves near to the binding to accommodate mother-of-pearl trims.
Filling and Sanding
To remove any lumps and grooves, the whole exterior of the body is sanded using progressively finer grain sizes. The large ridges in the grain of some of the woods used for the backs and sides cannot be smoothed out with sanding. As demonstrated below, these are filled in with paste to create a superflat surface.
Lacquering And Drying
The filler must completely dry out before the body is sprayed in lacquer, a liquid that dries into a hard, protective surface. The Guitars are then placed on hooks in rows like sides of beef. Less lacquer is required when the surfaces are smooth, which is crucial because a coat that is too thick would damper the Guitar’s vibrations and muddy its tone. After that, the lacquer’s surface may still have little lumps, or “orange peel,” on it. They are smoothed out.
Polishing
To achieve a glassy gloss, the Guitar’s body is polished in three phases. It is first gently pressed into a large buffing wheel that is wrapped in cotton fabric that has been loaded with wax by a robotic arm using suction. The wheel and arm both feature sensors that can determine how much pressure is being applied, allowing them to press only lightly. The polish is then hand-finished using a smaller buffing wheel and eventually soft lamb’s wool.
Cutting The Fretboard And Neck
The fretboard and neck are carved out by a router. The fretboard, commonly referred to as a fingerboard, is constructed of ebony, a wood that retains its appearance even after years of being pressed by steel strings. Frets, which are nickel bars, line the inside. To alter the note the string sends out, Guitarists apply pressure to the space between two frets. A mathematical formula determines the spacing, which must be precise in order to produce the desired notes.
Fretting
It’s time to add frets after the fretboard has been cut into small spaces. A typical model has 20. With the use of a hammer, the technician inserts sections of fret wire into each of those grooves. Then, the apparatus stamps them into position with sufficient force to wedge them in at the proper height.
Building The Neck
With a steel truss rod inserted between the fretboard and neck, which are bonded together, the Guitar is constructed. Once the Guitar is built, you won’t be able to see this rod, but it still serves a crucial function: By keeping the neck straight, it helps reduce the strain that the Guitar’s tightened strings cause. The neck is polished and sanded once all these parts have been assembled.
Fitting The Neck
After passing through the factory independently, the Guitar neck and body are now ready to be assembled. They are cemented into place and link through a small joint known as a compound dovetail. The Guitar’s vibrations move over the instrument more efficiently and produce a crisper tone the better the neck fits the body.
Bridge Design
It’s time to choose the Guitar bridge, which is located directly below the sound hole and is where the strings are attached to the body. A gauge is a tool that uses to determine where and how high something should be. It’s crucial to choose the ideal setting for this: If the tension is too high, it becomes extremely difficult to push the strings down; if the tension is too low, the strings may not clear the frets beneath the one you intend to press, producing an unpleasant buzzing sound.
Pleking
Now focusing on the frets after the instrument is completely put together. The entire Guitar is placed in a Plek chamber, which models the frets in three dimensions and simulates the stress the strings will apply to the body and neck. It will sand them down to the proper height if it detects that they are too high or too low in specific places, which also lessens buzzing.
Stringing
The Guitar is now prepared to be strung. Each of the six steel strings is stretched during a final inspection from the Guitar bridge all the way up to the metal pegs at the head. (According to Frank Untermyer, the manufacturer’s director of supply-chain management, each Guitar requires roughly 15 feet of a steel string, and the business consumes more than 500,000 feet of wire annually. After letting it settle, the Guitar is tuned and put away.)
Last Inspection
You can now take out the Guitar and play it again after about four days. There are times when something goes wrong, like a large crack developing, although this is rare. The tone and playability of the Guitar must be examined. Use every fret and string while playing up and down the entire fretboard, alternating between fingerpicking (playing individual notes) and strumming (playing a chord, several notes at the same time). Sometimes, You may start singing along to the radio while strumming a familiar melody.